


Dehydrating Fruit For Long Term Storage & Snacks
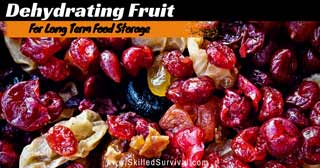
Dehydrating fruit is ideal for storing nutritious snacks without relying on your freezer (because freezers require electricity).
However, you’ll need a food dehydrator, and a quality vacuum sealer to make these snacks last.
You’ll also learn the science of packaging.
Fortunately, the overall process of dehydrating fruit is fairly straightforward.
Ideally, dehydrating fruit should be performed during the peak season for your target fruit.
That means you’ll dehydrate different fruits at different times of the year.
For instance, oranges, strawberries, and apricots have different peak seasons.
This is good news to me, as I enjoy different peak fruits throughout the year.

A good dehydrating fruit temperature is roughly 125 – 135 degrees Fahrenheit.
Any temperature above this range will cause the skin of some fruits to become very hard or crusty.
This hardened layer then creates a barrier and prevents the insides of the fruit from drying properly.
So it’s recommended that you remember that dehydration is a slow process.
It takes time and should not be rushed.
Preparation is key to successful dehydration.
First, slice the fruit carefully. The thickness of the slices affects the results.
If slices are too thick, they may not achieve full dehydration, no matter how long you leave them in the dehydrator.
Plus, you will need to increase the drying time for thicker fruits.
The thinner the slices of the fruits being dried, the quicker will be the drying time.
Decide how thick thin you want your fruit to be; keep them as consistent as possible.
The thickness consistency of individual slices will provide uniform drying of that specific fruit piece.
And consistency between fruit slices allows the entire batch to dry evenly.
To get nearly perfect consistency, I recommend a good Madeline slicer.
A slicer such as this makes the dehydrating prep work a breeze.
Once my fruit is sliced properly, I like to run cold water over the slices for several seconds.
This helps remove any slight lumps and makes the surface a bit smoother.
You should spray the slices with lemon juice, such as apples, strawberries, and bananas.
There are two different reasons why lemon juice is sprayed:
- To prevent the fruits from ugly browning
- To avoid bacterial growth while in the drying process
Now take all the fruit slices and lay them out on the drying rack.
You don’t want any overlap (this will negatively affect the drying process).
Now that you’ve prepped your fruit slices, it’s time to put them into your dehydrator.
Use the 125 – 135 degrees Fahrenheit temperature range and these approximate drying times, to help get you started:
These ranges are quite wide.
But that’s because each dehydrator, location, and fruit will differ for everyone.
You can safely set it and forget it until you reach the lower end of the time range.
At that point, you’ll want to check up on the slices periodically.
So when are they “done”?
It’s a personal preference.
The dryer the fruit is, the longer it will last in storage.
So if building your food stockpile is your main objective, then the dehydrated fruit should be drier, harder, and crisp.
If you plan to eat the fruit or add it to a party mix for the upcoming weekend, you might want to take them off when they still have a little moisture left.
They tend to have higher nutritional value and are rich in sugars.
But, avoid ones that have bruises or are overripe.
You’ll want to remove any wax or pesticides on the fruit.
About 1/8 of an inch is what I recommend.
You can easily bend or tear it apart but do not expect it to snap.
The model of the food dehydrator can sometimes affect the results.
Older models might not give you the outcome you prefer.
Newer models are equipped with extra features that give you more control which might improve your overall results.
Humidity will most definitely affect your results.
High humidity will extend the drying time, while low humidity will reduce it.
Amount of fruit slices in the dehydrator
Not all dehydrators are capable of lots of fruit.
Do not be tempted to cram more slices in than what you’re dehydrator is designed for…
The lower the temperature, the longer it will take.
Some people recommend using a reduced temperature range of 105-110 degrees to help preserve more of the fruit’s natural nutrients and enzymes.
All fruits and different varieties of fruits will dry a little bit differently.
Mixing and matching different fruits within the dehydrator will create unique flavors.
Give it a try.
Adding dehydrated fruit to your family’s emergency food stockpile is easy and smart.
Just follow the directions, and you’ll have a nice stash of fruit for short-term or long-term survival scenarios.
P.s. Are you ready for the tough times ahead?
Find out now by taking my short Readiness Score Quiz – it’s absolutely free.
Once complete, you’ll know exactly where you stand on the “fragile” vs.” resilient” spectrum.
So click here to start the Quiz….And don’t worry; the questions are so easy a 3rd grader could answer them.

Click on the image to begin the Quiz and find out once and for all if you’re part of “The Fragile Masses” or “The Resilient Few.”
The post Dehydrating Fruit Is A Simple Way To Preserve Tasty Calories appeared first on Skilled Survival.

Augason Farms Lunch and Dinner Variety Pail Emergency Food Supply 4-Gallon Pail
24% Off
Ready Hour, Fruit & Veggie Mix, Real Non-Perishable Freeze-Dried Food, 30-Year Shelf Life, Portable Emergency and Adventure Food Supply, Durable Flood Safe Container, 56 Servings

4Patriots: 3-Month Survival Food Kit - Emergency Food Supply, Freeze Dried Food, Designed To Last 25 Years, 688 Servings, 135,440 Total Calories, Disaster-Resistant Packaging
ReadyWise Emergency Food 30-Day Supply, Freeze-Dried Survival Food for Emergencies, Breakfast, Lunch, and Dinner, 2 Buckets, 25-Year Shelf Life, 298 Servings Total

Ready Hour, Emergency Meal Entrées, Real Non-Perishable Meals, 25-Year Shelf Life, Portable, Durable Flood-Safe Container, 120 Servings

Grizzly Gear Emergency Food Rations- 3600 Calorie Blueberry Bar - 3 Day, 72 Hour Supply For Disaster, Hurricane, Flood Preparedness - Less Sugar, More Nutrients Than Leading Brands - 5 Year Shelf Life
10% Off
ReadyWise Emergency Food Supply, Freeze-Dried Survival Food for Emergencies, Breakfast, Lunch, and Dinner Entrées, 1 Bucket, 25-Year Shelf Life, 124 Servings Total

ReadyWise Emergency Food Supply, Freeze-Dried Survival Food for Emergencies, Breakfast, Lunch, Dinner, and Drink Mix, 1 Bucket, 25-Year Shelf Life, 52 Servings Total
20% Off
Augason Farms Dehydrated and Freeze-Dried Fruit Variety Pail, 25-Year Shelf Life, Emergency Food Supply, Camping Food

ReadyWise Long Term Emergency Food Supply, Breakfast and Entree Variety, 36 Buckets- Total of 4320 Servings
11% Off- Advertisement -